Welcome FLUX.2 - BFL’s new open image generation model 🤗


FLUX.2 is the recent series of image generation models from Black Forest Labs, preceded by the Flux.1 series. It is an entirely new model with a new architecture and pre-training done from scratch!
 In this post, we discuss the key changes introduced in FLUX.2, performing inference with it under various setups, and LoRA fine-tuning.
🚨 FLUX.2 is not meant to be a drop-in replacement of FLUX.1, but a new image generation and editing model.
Table of contents
FLUX.2: A Brief Introduction
FLUX.2 can be used for both image-guided and text-guided image generation. Furthermore, it can take multiple images as reference inputs, while producing the final output image. Below, we briefly discuss the key changes introduced in FLUX.2.

Text encoder
First, instead of two text encoders as in Flux.1, it uses a single text encoder — Mistral Small 3.1. Using a single text encoder greatly simplifies the process of computing prompt embeddings. The pipeline allows for a max_sequence_length of 512. Instead of using a single-layer output for the prompt embedding, FLUX.2 stacks outputs from intermediate layers, which have been known to be more beneficial.
DiT
FLUX.2 follows the same general multimodel diffusion transformer (MM-DiT) + parallel DiT architecture as Flux.1. As a refresher, MM-DiT blocks first process the image latents and conditioning text in separate streams, only joining the two together for the attention operation, and are thus referred to as “double-stream” blocks. The parallel blocks then operate on the concatenated image and text streams and can be regarded as “single-stream” blocks.
The key DiT changes from Flux.1 to FLUX.2 are as follows:
Time and guidance information (in the form of AdaLayerNorm-Zero modulation parameters) is shared across all double-stream and single-stream transformer blocks, respectively, rather than having individual modulation parameters for each block as in Flux.1.
None of the layers in the model use
biasparameters. In particular, neither the attention nor feedforward (FF) sub-blocks of either transformer block usebiasparameters in any of their layers.In Flux.1, the single-stream transformer blocks fused the attention output projection with the FF output projection. FLUX.2 single-stream blocks also fuse the attention QKV projections with the FF input projection, creating a fully parallel transformer block:
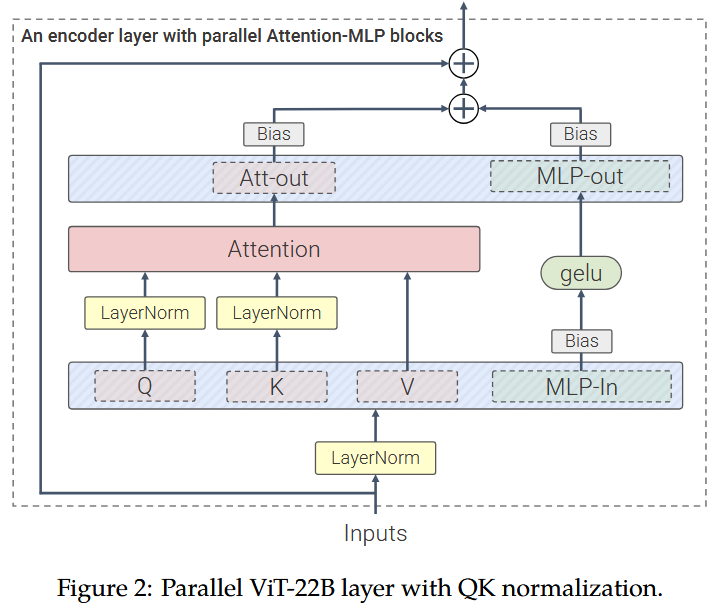
Figure taken from the ViT-22B paper. Note that compared to the
ViT-22Bblock depicted above, FLUX.2 uses a SwiGLU-style MLP activation rather than a GELU activation (and also doesn’t usebiasparameters).A larger proportion of the transformer blocks in FLUX.2 are single-stream blocks (
8double-stream blocks to48single-stream blocks, compared to19/38for Flux.1). This also means that single-stream blocks make up a larger proportion of the DiT parameters:Flux.1[dev]-12Bhas ~54% of its total parameters in the double-stream blocks, whereasFLUX.2[dev]-32Bhas ~24% of its parameters in the double-stream blocks (and ~73% in the single-stream blocks).
Misc
- A new Autoencoder aka
AutoencoderKLFlux2 - Better way to incorporate resolution-dependent timestep schedules
Inference With Diffusers
FLUX.2 uses a larger DiT and Mistral3 Small as its text encoder. When used together without any kind of offloading, the inference takes more than 80GB VRAM. In the following sections, we show how to perform inference with FLUX.2 in more accessible ways, under various system-level constraints.
Installation and Authentication
Before you try out the following code snippets, make sure you have installed diffusers from main and have run hf auth login.
pip uninstall diffusers -y && pip install git+https://github.com/huggingface/diffusers -U
Regular Inference
from diffusers import Flux2Pipeline
import torch

repo_id = "black-forest-labs/FLUX.2-dev"
pipe = Flux2Pipeline.from_pretrained(repo_id, torch_dtype=torch.bfloat16)
pipe.enable_model_cpu_offload()

image = pipe(
    prompt="dog dancing near the sun",
    num_inference_steps=50, # 28 is a good trade-off
    guidance_scale=4,
    height=1024,
    width=1024
).images[0]
The above code snippet was tested on an H100, and it isn’t sufficient to run inference on it without CPU offloading. With CPU offloading enabled, this setup takes ~62GB to run.
Users who have access to Hopper-series GPUs can take advantage of Flash Attention 3 to speed up inference:
from diffusers import Flux2Pipeline
import torch

repo_id = "black-forest-labs/FLUX.2-dev"
pipe = Flux2Pipeline.from_pretrained(path, torch_dtype=torch.bfloat16)
+ pipe.transformer.set_attention_backend("_flash_3_hub")
pipe.enable_model_cpu_offload()

image = pipe(
    prompt="dog dancing near the sun",
    num_inference_steps=50,
    guidance_scale=2.5,
    height=1024,
    width=1024
).images[0]
You can check out the supported attention backends (we have many!) here.
Resource-constrained
Using 4-bit quantization
Using bitsandbytes, we can load the transformer and text encoder models in 4-bit, allowing owners of 24GB GPUs to use the model locally. You can run this snippet on a GPU with ~20 GB of free VRAM.
Unfold
import torch
from transformers import Mistral3ForConditionalGeneration

from diffusers import Flux2Pipeline, Flux2Transformer2DModel

repo_id = "diffusers/FLUX.2-dev-bnb-4bit"
device = "cuda:0"
torch_dtype = torch.bfloat16

transformer = Flux2Transformer2DModel.from_pretrained(
  repo_id, subfolder="transformer", torch_dtype=torch_dtype, device_map="cpu"
)
text_encoder = Mistral3ForConditionalGeneration.from_pretrained(
  repo_id, subfolder="text_encoder", dtype=torch_dtype, device_map="cpu"
)

pipe = Flux2Pipeline.from_pretrained(
  repo_id, transformer=transformer, text_encoder=text_encoder, torch_dtype=torch_dtype
)
pipe.enable_model_cpu_offload()

prompt = "Realistic macro photograph of a hermit crab using a soda can as its shell, partially emerging from the can, captured with sharp detail and natural colors, on a sunlit beach with soft shadows and a shallow depth of field, with blurred ocean waves in the background. The can has the text `BFL Diffusers` on it and it has a color gradient that start with #FF5733 at the top and transitions to #33FF57 at the bottom."

image = pipe(
  prompt=prompt,
  generator=torch.Generator(device=device).manual_seed(42),
  num_inference_steps=50, # 28 is a good trade-off
  guidance_scale=4,
).images[0]

image.save("flux2_t2i_nf4.png")
Notice that we're using a repository that contains the NF4-quantized versions of the FLUX.2 DiT and the Mistral text encoder.
Local + remote
Due to the modular design of a Diffusers pipeline, we can isolate modules and work with them in sequence. We decouple the text encoder and deploy it to an Inference Endpoint. This helps us with freeing up the VRAM usage for the DiT and VAE only.
⚠️ To use the remote text encoder, you need to have a valid token. If you are already authenticated, no further action is needed.
The example below uses a combination of local and remote inference. Additionally, we quantize the DiT with NF4 quantization through bitsandbytes.
You can run this snippet on a GPU with 18 GB of VRAM:
Unfold
from diffusers import Flux2Pipeline, Flux2Transformer2DModel
from diffusers import BitsAndBytesConfig as DiffBitsAndBytesConfig
from huggingface_hub import get_token
import requests
import torch
import io

def remote_text_encoder(prompts: str | list[str]):
  def _encode_single(prompt: str):
      response = requests.post(
          "/static-proxy?url=https%3A%2F%2Fremote-text-encoder-flux-2.huggingface.co%2Fpredict%26quot%3B%3C%2Fspan%3E%2C
          json={"prompt": prompt},
          headers={
              "Authorization": f"Bearer {get_token()}",
              "Content-Type": "application/json"
          }
      )
      assert response.status_code == 200, f"{response.status_code=}"
      return torch.load(io.BytesIO(response.content))

  if isinstance(prompts, (list, tuple)):
      embeds = [_encode_single(p) for p in prompts]
      return torch.cat(embeds, dim=0)

  return _encode_single(prompts).to("cuda")

repo_id = "black-forest-labs/FLUX.2-dev"
quantized_dit_id = "diffusers/FLUX.2-dev-bnb-4bit"
dit = Flux2Transformer2DModel.from_pretrained(
  quantized_dit_id, subfolder="transformer", torch_dtype=torch_dtype, device_map="cpu"
)

pipe = Flux2Pipeline.from_pretrained(
  repo_id,
  text_encoder=None,
  transformer=dit,
  torch_dtype=torch.bfloat16,
)
pipe.enable_model_cpu_offload()

print("Running remote text encoder ☁️")
prompt1 = "a photo of a forest with mist swirling around the tree trunks. The word 'FLUX.2' is painted over it in big, red brush strokes with visible texture"
prompt2 = "a photo of a dense forest with rain. The word 'FLUX.2' is painted over it in big, red brush strokes with visible texture"
prompt_embeds = remote_text_encoder([prompt1, prompt2])
print("Done ✅")

out = pipe(
  prompt_embeds=prompt_embeds,
  generator=torch.Generator(device="cuda").manual_seed(42),
  num_inference_steps=50, # 28 is a good trade-off
  guidance_scale=4,
  height=1024,
  width=1024,
)

for idx, image in enumerate(out.images):
  image.save(f"flux_out_{idx}.png")
For GPUs with even lower VRAM, we have group_offloading, which allows GPUs with as little as 8GB of free VRAM to use this model. However, you'll need 32GB of free RAM. Alternatively, if you're willing to sacrifice some speed, you can set low_cpu_mem_usage=True to reduce the RAM requirement to just 10GB.
Unfold
import io
import os

import requests
import torch

from diffusers import Flux2Pipeline, Flux2Transformer2DModel

repo_id = "diffusers/FLUX.2-dev-bnb-4bit"
torch_dtype = torch.bfloat16
device = "cuda"

def remote_text_encoder(prompts: str | list[str]):
  def _encode_single(prompt: str):
      response = requests.post(
          "/static-proxy?url=https%3A%2F%2Fremote-text-encoder-flux-2.huggingface.co%2Fpredict%26quot%3B%3C%2Fspan%3E%2C
          json={"prompt": prompt},
          headers={"Authorization": f"Bearer {os.environ['HF_TOKEN']}", "Content-Type": "application/json"},
      )
      assert response.status_code == 200, f"{response.status_code=}"
      return torch.load(io.BytesIO(response.content))

  if isinstance(prompts, (list, tuple)):
      embeds = [_encode_single(p) for p in prompts]
      return torch.cat(embeds, dim=0)

  return _encode_single(prompts).to("cuda")

transformer = Flux2Transformer2DModel.from_pretrained(
  repo_id, subfolder="transformer", torch_dtype=torch_dtype, device_map="cpu"
)

pipe = Flux2Pipeline.from_pretrained(
  repo_id,
  text_encoder=None,
  transformer=transformer,
  torch_dtype=torch_dtype,
)
pipe.transformer.enable_group_offload(
  onload_device=device,
  offload_device="cpu",
  offload_type="leaf_level",
  use_stream=True,
  # low_cpu_mem_usage=True # uncomment for lower RAM usage
)
pipe.to(device)

prompt = "a photo of a forest with mist swirling around the tree trunks. The word 'FLUX.2' is painted over it in big, red brush strokes with visible texture"
prompt_embeds = remote_text_encoder(prompt)

image = pipe(
  prompt_embeds=prompt_embeds,
  generator=torch.Generator(device=device).manual_seed(42),
  num_inference_steps=50,
  guidance_scale=4,
  height=1024,
  width=1024,
).images[0]
You can check out other supported quantization backends here and other memory-saving techniques here.
To check how different quantizations affect an image, you can play with the playground below or access it as standlone in the FLUX.2 Quantization experiments Space
Multiple images as reference
FLUX.2 supports using multiple images as inputs, allowing you to use up to 10 images. However, keep in mind that each additional image will require more VRAM. You can reference the images by index (e.g., image 1, image 2) or by natural language (e.g., the kangaroo, the turtle). For optimal results, the best approach is to use a combination of both methods.
Unfold
import torch
from transformers import Mistral3ForConditionalGeneration

from diffusers import Flux2Pipeline, Flux2Transformer2DModel
from diffusers.utils import load_image

repo_id = "diffusers-internal-dev/new-model-image-final-weights"
device = "cuda:0"
torch_dtype = torch.bfloat16

pipe = Flux2Pipeline.from_pretrained(
  repo_id, torch_dtype=torch_dtype
)
pipe.enable_model_cpu_offload()

image_one = load_image("https://huggingface.co/datasets/huggingface/documentation-images/resolve/main/flux2_blog/kangaroo.png")
image_two = load_image("https://huggingface.co/datasets/huggingface/documentation-images/resolve/main/flux2_blog/turtle.png")

prompt = "the boxer kangaroo from image 1 and the martial artist turtle from image 2 are fighting in an epic battle scene at a beach of a tropical island, 35mm, depth of field, 50mm lens, f/3.5, cinematic lighting"

image = pipe(
  prompt=prompt,
  image=[image_one, image_two],
  generator=torch.Generator(device=device).manual_seed(42),
  num_inference_steps=50,
  guidance_scale=2.5,
  width=1024,
  height=768,
).images[0]

image.save(f"./flux2_t2i.png")

|

|

|
|
Advanced Prompting
FLUX.2 supports advanced prompting techniques like structured JSON prompting, precise hex color control, and multi-reference image editing.
Aside for the added control, this also allows for flexibility in changing specific attributes while maintaining others overall the same.
For example, let's start with this json as the base schema (taken from the official FLUX.2 prompting guide):
{
  "scene": "overall scene description",
  "subjects": [
    {
      "description": "detailed subject description",
      "position": "where in frame",
      "action": "what they're doing"
    }
  ],
  "style": "artistic style",
  "color_palette": ["#hex1", "#hex2", "#hex3"],
  "lighting": "lighting description",
  "mood": "emotional tone",
  "background": "background details",
  "composition": "framing and layout",
  "camera": {
    "angle": "camera angle",
    "lens": "lens type",
    "depth_of_field": "focus behavior"
  }
}
Building up on that, let's turn it into a prompt for a shot of a good old fashion walkman on a carpet (simply pass this prompt to your chosen diffusers inference example from above):
prompt = """
{
  "scene": "Professional studio product photography setup with soft-textured carpet surface",
  "subjects": [
    {
      "description": "Old silver Walkman placed on a carpet in the middle of an empty room",
      "pose": "Stationary, lying flat",
      "position": "Center foreground on carpeted surface",
      "color_palette": ["brushed silver", "dark gray accents"]
    }
  ],
  "style": "Ultra-realistic product photography with commercial quality",
  "color_palette": ["brushed silver", "neutral beige", "soft white highlights"],
  "lighting": "Three-point softbox setup creating soft, diffused highlights with no harsh shadows",
  "mood": "Clean, professional, minimalist",
  "background": "Soft-textured carpet surface with subtle studio backdrop suggesting an empty room",
  "composition": "rule of thirds",
  "camera": {
    "angle": "high angle",
    "distance": "medium shot",
    "focus": "Sharp focus on metallic Walkman textures and physical controls",
    "lens-mm": 85,
    "f-number": "f/5.6",
    "ISO": 200
  }
}

"""

Now, let's change the color of the carpet to a specific teal-blue shade (#367588) and add wired headphones plugged into the walkman:
prompt = """
{
  "scene": "Professional studio product photography setup with soft-textured carpet surface",
  "subjects": [
    {
      "description": "Old silver Walkman placed on a teal-blue carpet (#367588) in the middle of an empty room, with wired headphones plugged in",
      "pose": "Stationary, lying flat",
      "position": "Center foreground on carpeted surface",
      "color_palette": ["brushed silver", "dark gray accents", "#367588"]
    },
    {
      "description": "Wired headphones connected to the Walkman, cable loosely coiled on the carpet",
      "pose": "Stationary",
      "position": "Next to and partially in front of the Walkman on the carpet",
      "color_palette": ["dark gray", "soft black", "#367588"]
    }
  ],
  "style": "Ultra-realistic product photography with commercial quality",
  "color_palette": ["brushed silver", "#367588", "neutral beige", "soft white highlights"],
  "lighting": "Three-point softbox setup creating soft, diffused highlights with no harsh shadows",
  "mood": "Clean, professional, minimalist",
  "background": "Soft-textured teal-blue carpet surface (#367588) with subtle studio backdrop suggesting an empty room",
  "composition": "rule of thirds",
  "camera": {
    "angle": "high angle",
    "distance": "medium shot",
    "focus": "Sharp focus on metallic Walkman textures, wired headphones, and carpet fibers",
    "lens-mm": 85,
    "f-number": "f/5.6",
    "ISO": 200
  }
}
"""

|

|
The carpet color now matches the hex code provided, and the headphones have been with small changes to the overall scene.
Check out the official prompting guide for more examples and details.
LoRA fine-tuning
Being both a text-to-image and an image-to-image model, FLUX.2 makes the perfect fine-tuning candidate for many use-cases! However, as inference alone takes more than 80GB of VRAM, LoRA fine-tuning is even more challenging to run on consumer GPUs. To squeeze in as much memory saving as we can, we utilize some of the inference optimizations described above for training as well, together with shared memory saving techniques, to substantially reduce memory consumption. To train it, you can use either the diffusers code below or Ostris' AI Toolkit.
We provide both text-to-image and image-to-image training scripts, for the purpose of this blog will focus on a text-to-image training example.
Memory optimizations for fine-tuning
Many of these techniques complement each other and can be used together to reduce memory consumption further. However, some techniques may be mutually exclusive, so be sure to check before launching a training run.
Unfold to check details on the memory-saving techniques used:
- Remote Text Encoder: to leverage the remote text encoding for training, simply pass
--remote_text_encoder. Note that you must either be logged in to your Hugging Face account (hf auth login) OR pass a token with--hub_token. - CPU Offloading: by passing
--offloadthe vae and text encoder to will be offloaded to CPU memory and only moved to GPU when needed. - Latent Caching: Pre-encode the training images with the vae, and then delete it to free up some memory. To enable
latent_cachingsimply pass--cache_latents. - QLoRA: Low Precision Training with Quantization - using 8-bit or 4-bit quantization. You can use the following flags:
- FP8 training with
torchao: enable FP8 training by passing--do_fp8_training. Since we are utilizing FP8 tensor cores, we need CUDA GPUs with compute capability at least 8.9 or greater. If you're looking for memory-efficient training on relatively older cards, we encourage you to check out other trainers likeSimpleTuner,ai-toolkit, etc. - NF4 training with
bitsandbytes: Alternatively, you can use 8-bit or 4-bit quantization withbitsandbytesby passing:---bnb_quantization_config_pathwith a corresponding path to a json file containing your config. see below for more details.
- FP8 training with
- Gradient Checkpointing and Accumulation:
--gradient accumulationrefers to the number of updates steps to accumulate before performing a backward/update pass.by passing a value > 1 you can reduce the amount of backward/update passes and hence also memory reqs.* with--gradient checkpointingwe can save memory by not storing all intermediate activations during the forward pass.Instead, only a subset of these activations (the checkpoints) are stored and the rest is recomputed as needed during the backward pass. Note that this comes at the expanse of a slower backward pass. - 8-bit-Adam Optimizer: When training with
AdamW(doesn't apply toprodigy) You can pass--use_8bit_adamto reduce the memory requirements of training. Make sure to installbitsandbytesif you want to do so.
Please make sure to check out the README for prerequisites before starting training.
For this example, we’ll use multimodalart/1920-raider-waite-tarot-public-domain dataset with the following configuration using FP8 training. Feel free to experiment more with the hyper-parameters and share your results 🤗
accelerate launch train_dreambooth_lora_flux2.py \
  --pretrained_model_name_or_path="black-forest-labs/FLUX.2-dev"  \
  --mixed_precision="bf16" \
  --gradient_checkpointing \
  --remote_text_encoder \
  --cache_latents \
  --caption_column="caption"\
  --do_fp8_training \
  --dataset_name="multimodalart/1920-raider-waite-tarot-public-domain" \
  --output_dir="tarot_card_Flux2_LoRA" \
  --instance_prompt="trcrd tarot card" \
  --resolution=1024 \
  --train_batch_size=2 \
  --guidance_scale=1 \
  --gradient_accumulation_steps=1 \
  --optimizer="adamW" \
  --use_8bit_adam\
  --learning_rate=1e-4 \
  --report_to="wandb" \
  --lr_scheduler="constant_with_warmup" \
  --lr_warmup_steps=200 \
  --checkpointing_steps=250\
  --max_train_steps=1000 \
  --rank=8\
  --validation_prompt="a trtcrd of a person on a computer, on the computer you see a meme being made with an ancient looking trollface, 'the shitposter' arcana, in the style of TOK a trtcrd, tarot style" \
  --validation_epochs=25 \
  --seed="0"\
  --push_to_hub

|

|
The left image was generated using the pre-trained FLUX.2 model, and the right image was produced the LoRA.
In case your hardware isn’t compatible with FP8 training, you can use QLoRA with bitsandbytes. You first need to define a config.json file like so:
{
    "load_in_4bit": true,
    "bnb_4bit_quant_type": "nf4"
}
And then pass its path to --bnb_quantization_config_path:
accelerate launch train_dreambooth_lora_flux2.py \
  --pretrained_model_name_or_path="black-forest-labs/FLUX.2-dev"  \
  --mixed_precision="bf16" \
  --gradient_checkpointing \
  --remote_text_encoder \
  --cache_latents \
  --caption_column="caption"\
  **--bnb_quantization_config_path="config.json" \**
  --dataset_name="multimodalart/1920-raider-waite-tarot-public-domain" \
  --output_dir="tarot_card_Flux2_LoRA" \
  --instance_prompt="a tarot card" \
  --resolution=1024 \
  --train_batch_size=2 \
  --guidance_scale=1 \
  --gradient_accumulation_steps=1 \
  --optimizer="adamW" \
  --use_8bit_adam\
  --learning_rate=1e-4 \
  --report_to="wandb" \
  --lr_scheduler="constant_with_warmup" \
  --lr_warmup_steps=200 \
  --max_train_steps=1000 \
  --rank=8\
  --validation_prompt="a trtcrd of a person on a computer, on the computer you see a meme being made with an ancient looking trollface, 'the shitposter' arcana, in the style of TOK a trtcrd, tarot style" \
  --seed="0"
Resources
- FLUX.2 announcement post
- Diffusers documentation
- FLUX.2 official demo
- FLUX.2 on the Hub
- FLUX.2 original codebase