---
title: EditP23
emoji: 🎨
colorFrom: blue
colorTo: purple
sdk: gradio
sdk_version: 5.38.2
app_file: app.py
pinned: false
---
# EditP23: 3D Editing via Propagation of Image Prompts to Multi-View
[](https://editp23.github.io/)
[](https://arxiv.org/abs/2506.20652)
This repository contains the official implementation for **EditP23**, a method for fast, mask-free 3D editing that propagates 2D image edits to multi-view representations in a 3D-consistent manner.
The edit is guided by an image pair, allowing users to leverage any preferred 2D editing tool, from manual painting to generative pipelines.
### Installation
Click to expand installation instructions
This project was tested on a Linux system with Python 3.11 and CUDA 12.6.
**1. Clone the Repository**
```bash
git clone --recurse-submodules https://github.com/editp23/EditP23.git
cd EditP23
```
**2. Install Dependencies**
```bash
conda create -n editp23 python=3.11 -y
conda activate editp23
pip install torch torchvision --index-url https://download.pytorch.org/whl/cu126 # Ensure compatibility with your CUDA version. (tested with torch 2.6, cuda 12.6)
pip install diffusers==0.30.1 transformers accelerate pillow huggingface_hub numpy tqdm
```
### Quick Start
**1. Prepare Your Experiment Directory**
Create a directory for your experiment. Inside this directory, you must place three specific PNG files:
* `src.png`: The original, unedited view of your object.
* `edited.png`: The same view after you have applied your desired 2D edit.
* `src_mv.png`: The multi-view grid of the original object, which will be edited.
Your directory structure should look like this:
```text
examples/
└── robot_sunglasses/
├── src.png
├── edited.png
└── src_mv.png
```
**2. Run the Editing Script**
Execute the `main.py` script, pointing it to your experiment directory. You can adjust the guidance parameters based on the complexity of your edit.
#### Execution Examples
* **Mild Edit (Appearance Change):**
```bash
python src/main.py --exp_dir examples/robot_sunglasses --tar_guidance_scale 5.0 --n_max 31
```
* **Hard Edit (Large Geometry Change):**
```bash
python src/main.py --exp_dir examples/deer_wings --tar_guidance_scale 21.0 --n_max 39
```
The output will be saved in the `output/` subdirectory within your experiment folder.
### Command-Line Arguments
* `--exp_dir`: (Required) Path to the experiment directory.
* `--T_steps`: Total number of denoising steps. Default: `50`.
* `--n_max`: The number of denoising steps to apply edit-aware guidance. Higher values can help with more complex edits. Default: `31`. This value shouldn't exceed `T_steps`.
* `--src_guidance_scale`: CFG scale for the source condition. Can typically remain constant. Default: `3.5`.
* `--tar_guidance_scale`: CFG scale for the target (edited) condition. Higher values apply the edit more strongly. Default: `5.0`.
* `--seed`: Random seed for reproducibility. Default: `18`.
# Results in Multi-View
### Deer - Pixar style & Wings
| | Cond. View | View 1 | View 2 | View 3 |
| :--- |:-----------------------------------------------------------------:|:----------------------------------------------------:|:----------------------------------------------------:|:----------------------------------------------------:|
| **Original** | 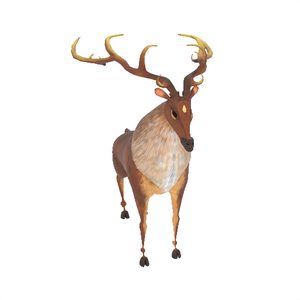 | 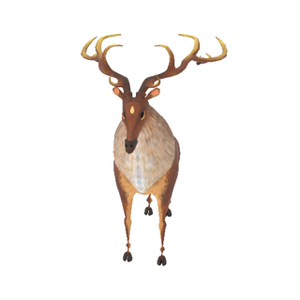 | 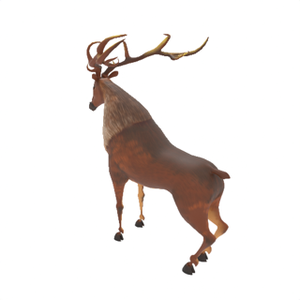 | 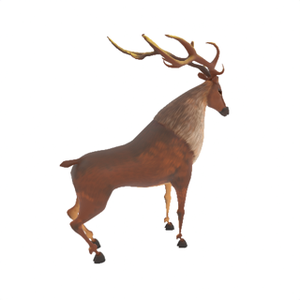 |
| **Pixar style** | 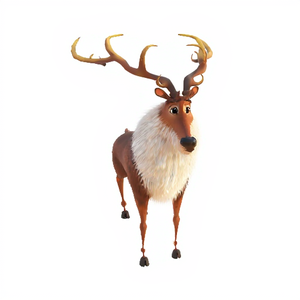 | 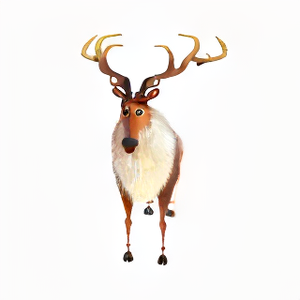 | 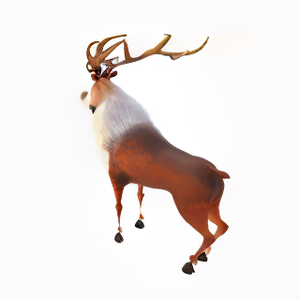 | 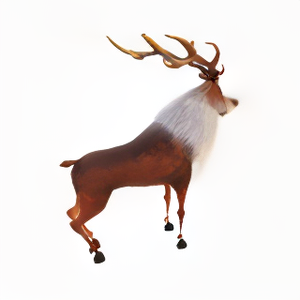 |
| **Wings** | 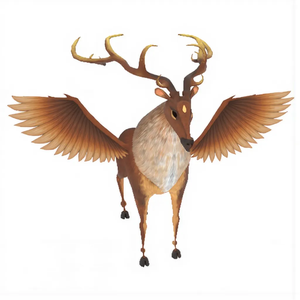 | 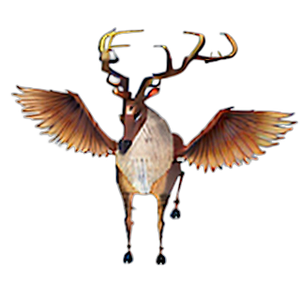 | 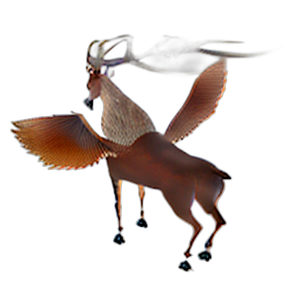 | 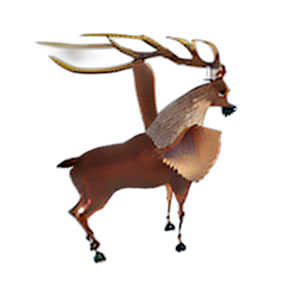 |
### Person - Old & Zombie
| | Cond. View | View 1 | View 2 | View 3 |
|:-------------|:-----------------------------------------------------------------:|:----------------------------------------------------:|:----------------------------------------------------:|:----------------------------------------------------:|
| **Original** | 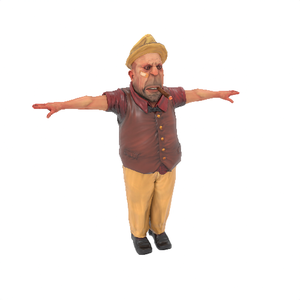 |  | 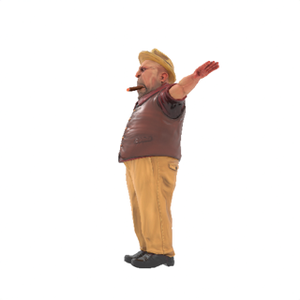 | 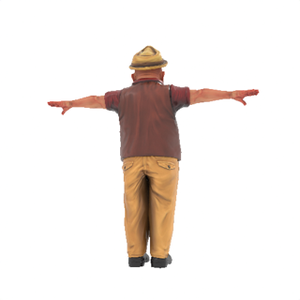 |
| **Old** | 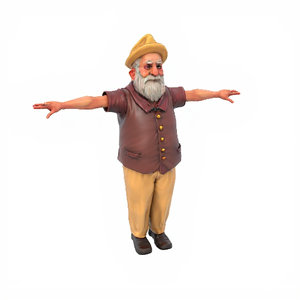 |  |  | 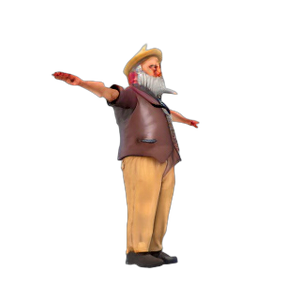 |
| **Zombie** | 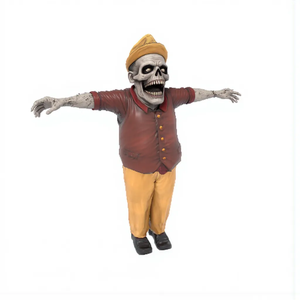 | 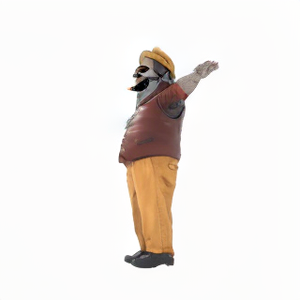 | 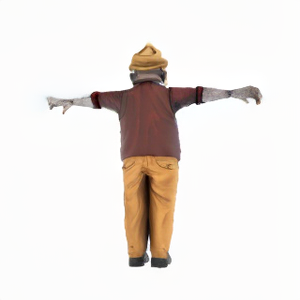 | 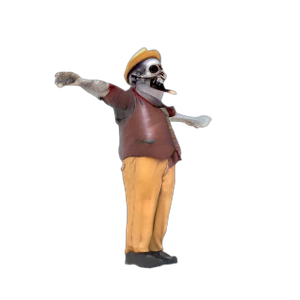 |
# Project Structure
The repository is organized as follows:
```text
EditP23/
├── examples/ # Example assets for quick testing
│ ├── deer_wings/
│ │ ├── src.png
│ │ ├── edited.png
│ │ └── src_mv.png
│ └── robot_sunglasses/
│ └── ...
├── assets/ # Raw asset files
│ └── stormtrooper.glb
├── scripts/ # Helper scripts for data preparation
│ ├── render_mesh.py
│ └── img2mv.py
├── src/ # Main source code
│ ├── init.py
│ ├── edit_mv.py
│ ├── main.py
│ ├── pipeline.py
│ └── utils.py
├── .gitignore
└── README.md
```
# Utilities
## Setup
This guide shows how to prepare inputs for **EditP23** and run an edit.
These helper scripts create the three PNG files every experiment needs:
| File | Purpose |
|---------------|-----------------------------------------------------------------|
| `src.png` | Original single view (the one you will edit). |
| `edited.png` | Your 2D edit of `src.png`. |
| `src_mv.png` | 6-view grid of the original object. |
### 1. Generate `src.png` and `src_mv.png`
**EditP23** needs a **source view** (`src.png`) and a **multi-view grid** (`src_mv.png`).
The grid contains six extra views at fixed azimuth/elevation pairs:
Angles (azimuth, elevation): `(30°, 20°) (90°, -10°) (150°, 20°) (210°, -10°) (270°, 20°) (330°, -10°)` and for the prompt view `(0°, 20°)`.
We provide two methods to generate these inputs. Both methods produce views on a clean, white background.
Both methods below produce the multi-view grid and the source view from the relevant angles on a white background.
#### Method A: From a Single Image
You can generate the multi-view grid from a single image of an object using our `img2mv.py` script. This script leverages the Zero123++ pipeline with a checkpoint from InstantMesh, which is fine-tuned to produce white backgrounds.
```bash
# This script takes a single input image and generates the corresponding multi-view grid.
python scripts/img2mv.py \
--input_image "examples/robot_sunglasses/src.png" \
--output_dir "examples/robot_sunglasses/"
```
**Note:** In this case, `src.png` serves as the source view for EditP23.
#### Method B: From a 3D Mesh
If you have a 3D model, you can use our Blender script to render both the source view and the multi-view grid.
**Prerequisite:** This script requires Blender (`pip install bpy`).
```bash
# This script renders a source view and a multi-view grid from a 3D mesh.
python scripts/render_mesh.py \
--mesh_path "assets/stormtrooper.glb" \
--output_dir "examples/stormtrooper/"
```
### 2. Generating `edited.png`
Once you have your **source view**, you can use any 2D image editor to make your desired changes. We use this user-provided edit to guide the 3D modification.
For quick edits, you can use readily available online tools, such as the following HuggingFace Spaces:
- [FlowEdit](https://huggingface.co/spaces/fallenshock/FlowEdit): Excellent for global, structural edits.
- [Flux-Inpainting](https://huggingface.co/spaces/black-forest-labs/FLUX.1-Fill-dev): Great for local modifications and inpainting.
## Reconstruction
After generating an edited multi-view image (`edited_mv.png`) with our main script, you can reconstruct it into a 3D model. We provide a helper script that uses the [InstantMesh](https://github.com/TencentARC/InstantMesh) framework to produce a textured `.obj` file and a turntable video.
### Additional Dependencies
First, you'll need to install several libraries required for the reconstruction process.
Click to expand installation instructions
```bash
# Install general dependencies
pip install opencv-python einops xatlas imageio[ffmpeg]
# Install NVIDIA's nvdiffrast library
pip install git+https://github.com/NVlabs/nvdiffrast/
# For video export, ensure ffmpeg is installed
# On conda, you can run:
conda install ffmpeg
```
### Running the Reconstruction
The reconstruction script takes the multi-view PNG as input and generates the 3D assets. The necessary model config file (instant-mesh-large.yaml) is included in the configs/ directory of the InstanMesh repository.
#### Example Command
````bash
python scripts/recon.py \
external/instant-mesh/configs/instant-mesh-large.yaml \
--input_file "examples/robot_sunglasses/output/edited_mv.png" \
--output_dir "examples/robot_sunglasses/output/recon/"
````
### Command-Line Arguments
Here are the arguments for the recon.py script:
| Argument | Description | Default |
| :------------ | :----------------------------------------------------------------- | :----------- |
| `config` | **(Required)** Path to the InstantMesh model config file. | |
| `--input_file`| **(Required)** Path to the multi-view PNG file you want to reconstruct. | |
| `--output_dir`| Directory where the output `.obj` and `.mp4` files will be saved. | `"outputs/"` |
| `--scale` | Scale of the input cameras. | `1.0` |
| `--distance` | Camera distance for rendering the output video. | `4.5` |
| `--no_video` | A flag to disable saving the `.mp4` video. | `False` |